Sunday, July 31, 2011

Ode to the Farmer's Market: Pasta Primavera

I heart the farmer's market.  The produce is fresh, affordable, you get the chance to reduce your carbon footprint and at the same time support local farmers.  Win-win-win-win.

But, as much as I love the farmer's market, sometimes I get a little excited and I buy too much.  Or I don't plan what I'm buying and I get home and don't know what to do with everything!  Given what I purchased most recently at the market, I decided to make a colorful Pasta Primavera.

Pasta Primavera
Makes: 6 servings
Start to finish: 1 hour

1 medium zucchini, sliced, halved
2 small yellow squash, sliced, halved
1 cup cherry tomatoes, halved
2 green peppers, cut into strips
1 large onion, diced
2 carrots, cut into matchsticks
4 cloves garlic, minced
1 Tbsp oil
8 oz whole wheat linguine
1 cup chicken broth
1/2 cup 1% milk
1 Tbsp flour
1/4 tsp salt
1/4 tsp pepper
1/2 cup grated Parmesan or Romano cheese
2 Tbsp fresh basil, chopped
1 Tbsp fresh parsley, chopped

The first thing you'll want to do is get all your chopping done.  There's quite a bit of knife work in this recipe.  For your squash, slice into 1/4 inch pieces and halve those.  Halve your cherry tomatoes.  If you're thinking about dicing a regular tomato, I did this, and I strongly discourage it, as they will disintegrate into nothingness as your food cooks.  Chop your carrots into little matchsticks.  Cut your peppers into strips, dice your onions, and chop the garlic cloves finely.

Heat a large skillet over medium-high heat with a tablespoon of oil.  When heated, add the onions and garlic and saute for about 60 seconds.  Add in all the other veggies and let them start to cook down.

Once the veggies start to become tender-crisp (about 5 minutes) add in 1 tablespoon flour.  Allow the flour to cook for 30 seconds to prevent a raw flour taste in your sauce.

At this time, add the chicken broth, milk, salt and pepper and bring the mixture to a boil.  While this is happening, you should also be boiling your linguine noodles.

Allow the sauce to cook down to half its original volume.  This could take anywhere from 5-10 minutes.

When your linguine is al dente, drain it in a collander and toss it back into the pot you cooked it in.  Add the veggies, sauce, cheese, and herbs.  Toss 'til everything is evenly distributed in the dish.


This is such a beautiful dish I can't think of a better way to pay tribute to the farmer's market.  I hope you enjoy it as much as I did!

Friday, July 29, 2011

Simple Strawberry Banana Smoothie


Have I told you lately how much I love summer? Maybe I have mentioned it a time or two.  As a continuation of my ode to summer, today I am going to share with you one of my favorite fruits: the strawberry.  Strawberries, like tomatoes, are only good for a short time every year.  True strawberry season is really only a month long- it's the month of May.  Only in May will you find strawberries so sweet and succulant that they are red to the core, but for several months afterwards, they are still pretty good if you know what to look for.  Not only that but the price tends to drop almost in half.  This is a great time to stock up on organic strawberries and freeze them for use throughout the year.

As much as I love fresh strawberries, I actually prefer them frozen when I make my favorite smoothie.  Having the strawberries frozen makes the smoothie thicker and colder than if you use fresh.

Now, odds are, if you can find strawberries on sale in the summer, they are much cheaper than buying pre-frozen ones.  Just this week I brought some home and this is how I froze them:

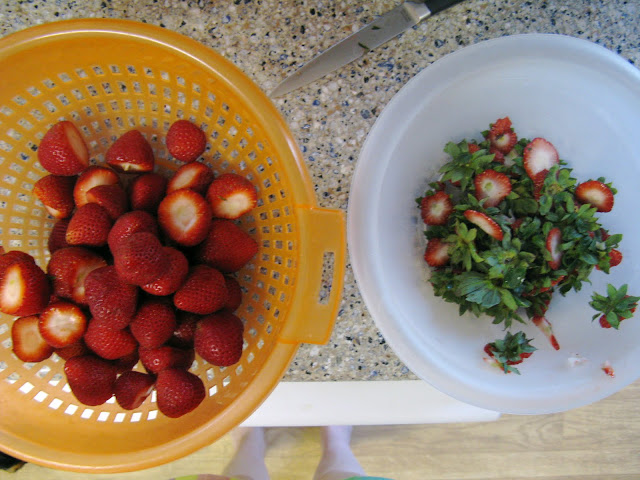
First, cut the stems off of the strawberries and place the trimmed strawberries into a collindar.
Rinse the strawberries under some warm water.  This will remove all the little seedlings.  You want your strawberries to be dry when you freeze them so you can let them air dry for quite some time or if you have a salad spinner you can do what I do and spin them dry.
Notice I have placed a towel around the rim of the spinner.  This makes the spinning action a little more gentle.

Next, spread your strawberries cut side down on a baking sheet.  Make sure they are in a single layer and not on top of one another.
Then place them in the freezer and leave them there for about 8 hours.

Once they are frozen they will look just as delicious and red as they did before you froze them!  Just put these in a ziploc freezer bag and try to remove all the air so as to prevent freezer burn.

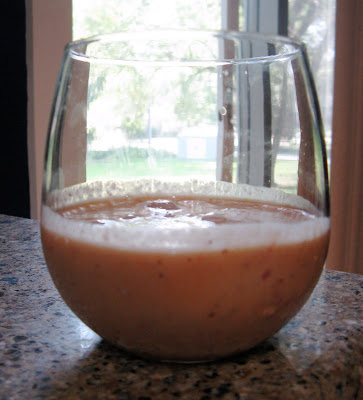
Now that you have frozen strawberries, you can make my smoothie.  This is a great on-the-go breakfast and if you have a Magic Bullet, your mixing bin doubles as a mug.

Simple Strawberry Banana Smoothie
Makes 1 serving
Start to finish: 5 minutes

5 medium frozen organic strawberries
1 banana
1/4 cup organic, plain, non-fat greek yogurt
1 oz orange juice
1/2 tsp agave nectar for added sweetness

Toss all these ingredients into a Magic Bullet, or blender, and let her rip until all the ingredients have broken down into a smooth liquid.

 I like my smoothies thick so I only add an ounce of orange juice but if you like yours a bit thinner feel free to add more.

So simple yet so delicious!  What do you like to put in your smoothies?

Thursday, July 28, 2011

Award Winning Suzy Q Cake

Ok, so I might be over-exaggerating a bit when I call this cake award winning, but it did win 2nd place in my company's bake-off.  I count that as an award.  There was a prize and a certificate, afterall :-).

This recipe comes from my grandmother.  It was a family favorite growing up.  When people ask what a Suzy Q Cake is, I tell them it's basically like eating a giant Ho Ho.  Is your mouth watering yet?

Suzy Q Cake
Makes 12 servings
Start to finish: about 2 hours

1 devil's food cake mix, prepared as directed
3 cups powdered sugar
1/2 cup shortening
1/2 cup canola oil
4 Tbsp butter
Dash of salt
1 large egg white
1 tsp vanilla extract

Prepare your devil's food cake as directed, or feel free to substitute applesauce for oil.  I like to add a teaspoon of vanilla extract.  I think it improves the flavor of any box cake mix.  Don't forget to pre-heat your oven to the instructed temperature.

Prepare two 8-inch round cake pans.  By "prepare" I mean coat them with a thin layer of butter and cocoa.
You're probably used to coating your pan with butter and flour.  This keeps the cake from sticking to the pan and makes it easy to release after baking.  However, because this is a chocolate cake, you don't want to coat the pan with flour because then you'll have white stuff all over the outer layer of your cake, and that's just not good for presentation sake.  This is why I coat mine with cocoa.
Evenly distribute the batter into each cake pan and bake as directed.  Ignore the phantom foot in the bottom right corner.  Somebody couldn't wait to start licking the bowl on the counter...
When a toothpick comes out clean from the center of your cake, pull it out and let the cakes cool on a wire wrack.
When the pan is cool enough to handle, turn your cake pan upside down on the wire wrack and give it a good tap.  The cake should pop right out.
Can you see how dark and chocolatey this mother is?  It's going to taste so good later.

While the cakes are cooling, start putting together your filling/frosting.  If you're looking for a light cool whip type frosting or if using fat in baking scares you a little bit, you should probably stop here.  I said this cake was award winning.  I didn't say it was healthy.

Combine the powdered sugar, oil, shortening, butter, and salt in a big mixing bowl.  Beat this on high for 5 minutes.  If you have a Kitchen Aid Mixer, I strongly advise using it here because if you have to use a hand mixer for 5 minutes, your hands will surely get tired.  After 5 minutes your frosting should look like this:
Very thick, very stiff peaks.

Now add your egg white and vanilla.  Beat on high for another 3 minutes, not a second shorter.  After 3 minutes it should look like this:
Notice how the texture has gone from super stiff and chunky to smooth and velvety.

By now your cakes should be cooled.  This is a four layer cake and as you have probably noticed, we only make two cakes.  This means you have to slice each layer in half.  Place your hand over the middle to brace the cake and use a sharp serrated knife to make a horizontal cut through the middle of each layer.

Now it's time to ice the cake.  I would go ahead and do this on whatever you intend your serving plate to be.  It's important that you have enough icing for each layer so take a spatula and kind of mark your icing into sections in the bowl.  That way you use the same amount in each layer.

Start with all your icing in the middle of the cake.  Then use a spatula or icing spreader to fan out the icing evenly across the cake.

Once the icing is spread you can lay down another cake layer and repeat the process until you've iced each layer.

There will likely be some crumbs that broke away from your cake.  Instead of wasting these, I spread them on top of the cake for some added contrast.  Crushed oreos or shaved chocolate would also be good.

If you are not going to serve this right away, I would put it in the refrigerator.  This will allow the icing to set up a little.  I would also have a glass of milk on standby, because you're going to need it when you slice into this cake.

Tuesday, July 26, 2011

What to do with Leftover Fruit Salad

A few days ago, I made an amazing fruit salad.

After I made said fruit salad, I discovered that my husband does not like fruit salad.  Needless to say, even though I ate it every day for several days, I was unable to consume this massive amount of fruit all by myself.  So, when the fruit salad looked like it was on its last leg, I got creative.

The first thing I tried to do was make a fruit smoothie.  Normally you wouldn't think to put grapes, apple, pineapple, oranges, strawberries and kiwi in a smoothie but I figured fruit is fruit right?

Fruit Salad Smoothie
Makes 1 smoothie
Start to finish: 5 minutes

1 cup leftover fruit salad
1/4 cup organic, non-fat
1 banana
1 oz juice from fruit salad

This recipe starts with spooning out a cup of the leftover fruit salad.

Take this and all your other ingredients and put it into a blender/Magic Bullet.  You may have noticed that over the last couple days your fruit salad has accumulated some juice at the bottom.  I used this juice to loosen up the smoothie.

You will have to be patient while you puree this.  The apples and grapes have skins that need plenty of time to breakdown into the smoothie.

Boom.  Done.  Delicious.  Moving on to my next idea.

Mixed Fruit Popsicles
Makes 3 popsicles
Start to finish: 5 minutes

1 cup leftover fruit salad
1 oz leftover fruit juice

Again with the spooning of the fruit, the pouring of the juice, and the blending in the bullet.  Pour the mixture into three popsicle molds (readily available just about anywhere during the summer).

Freeze your popsicle molds overnight and enjoy anytime you want a healthy sweet treat!

Sunday, July 24, 2011

Spicy Honey Chicken and Thai Peanut Noodles


 I love Asian cuisine, though I hardly ever make it at home.  It seems like every time I go to make a recipe there are multiple ingredients that I don't have (rice vinegar, sesame oil, tamari, chili paste, fish sauce...it's a long list).  I always tell myself that I'm going to invest in the the items so I have them on hand in my pantry but I never do.  This means that Asian food at my house is usually limited to stir fry and rice.  Imagine my delight and surprise when I came up with these two Asian inspired recipes that I could make using things I already had in my pantry!

The first one I adapted from Real Mom Kitchen.  I adjusted some of the spice levels and I left out the vinegar from the glaze because I think it sticks to the chicken better when it's not so thinned out.  I also only made 4 thighs instead of 8 and I basted the chicken more than the recipe directed.

Spicy Honey Chicken Thighs
Makes: 4 servings
Start to finish: 30 minutes

4 bone-in chicken thighs, skin removed

For the Rub:
2 tsp garlic powder
2 tsp chili powder
1/2 onion powder
1/2 tsp coriander
1/2 tsp salt
1 tsp cumin
1/4 tsp cayenne pepper

For the glaze:
1/4 cup honey

Start by removing the skin off your chicken thighs.

In a bowl, mix together all the spices and rub them into both sides of the chicken.

Turn on your broiler and line a cookie sheet with foil (this will prevent the messiness that would ensue if you let the basting juices go everywhere).  Place the chicken on the top rack under the broiler for 5 minutes.
After 5 minutes, flip the chicken over and broil for another 5 minutes.  

Take the chicken out and baste it with honey.  Move your oven rack down one level and return the chicken to the oven for 2 minutes.
After 2 minutes take the chicken out and baste it again.  In another two minutes baste it again.  At this point start checking for doneness, otherwise basting every two minutes.

While your chicken in broiling, you should be simultaneously working on this next dish:

Thai Peanut Noodles
Adapted from: Ellie Krieger
Makes 4 servings
Start to finish: 20 minutes

6 ounces whole wheat linguini noodles
1/4 cup natural peanut butter
2 Tbsp chicken broth
1.5 Tbsp soy sauce
2 tsp brown sugar
2 tsp ground ginger
1 Tbsp lime juice
1/2 tsp minced garlic
1/4 tsp red chili flakes (feel free to use more but I have a love-hate relationship with chili flakes)
1 Tbsp dried minced onion

Cook your noodles until they are al dente.   Blend all the sauce ingredients in a blender/food processor/Magic Bullet (I am a Magic Bullet fan myself).  

Mix this sauce with the pasta.  It's that easy.
I served my chicken and noodles alongside some edamame.  So there you have it, an easy dish when you need an asian fix and don't feel like investing in all the traditional asian ingredients.  

Friday, July 22, 2011

Vanilla Bean Gelato

When my husband and I visited San Francisco last year, I fell in love with gelato.  There is this gelato place in North Beach and we liked it so much that we walked a mile from our hotel, up those San Francisco streets, TWICE in the four days that we were there.

So when I saw gelato starter at Crate and Barrell, you can bet that I snatched it right up.

You may think this is cheating.  I mean, the point of making ice cream at home is that it is made from scratch.  Well, my husband and I have tested several ice cream recipes, and I think we were trying to hard to make it lighter so it never really tasted that good.  That being said, this option sounded alot more attractive.  

I also don't feel bad about this specific starter because the ingredients are very simple and arguably the same things I would use if I made it from scratch, except better because I would never spend money on real vanilla beans.
Now, this starter came with two packets.  We are on our second packet.  On the first try we basically followed instructions.  We added 2 cups of half and half and 1 cup of cream to the mix.  I never thought I would say this about ice cream, but it was TOO rich!  I couldn't eat more than a scoop at a time.  And what's the fun in that?

So this time, I lightened it up a bit... cautiously.  I kept the 2 cups half and half and instead of cream I added 1 cup 1% milk to the gelato mix.

Then I poured it into my ice cream machine and set the timer for 35 minutes. (This is one of the things I love about making ice cream, the machine does it all for you.)

About half way through you should start to see your ice cream thicken in the bowl.

You know your ice cream is ready when it's so thick it looks like it's about to bust out of your machine.  You might hear faint cries that sound like, "Eaaattt meeeeee."

As tempting as it may be to eat this straight from the bowl, your patience will be rewarded if you put it in the freezer for a couple hours, even overnight if you can humanly stand it.

The texture from this batch was noticeably different, more icy.  The first batch was super creamy.  This is to be expected as you reduce the fat content.  I am glad I reduced the fat because now it doesn't taste so overwhelmingly rich but next time I might try 2% milk to see if I can reduce the ice crystals a bit.  I have also heard adding an egg can help so I might try that as well.

At the end of the day, whether you follow my directions or theirs, if you have an ice cream machine, I highly recommend this mix.

Here's to summer!

Thursday, July 21, 2011

Summer Fruit Salad


I am so excited by all the fruit that is in season right now. It tastes better, it's easier to find organic options, and it costs a lot less to consume.  My local grocery store had quite the sale on different fruits this week and the only way I thought I'd be able to consume it all was by making a fruit salad.  My sister-in-law makes the best fruit salad and she always brings it to family functions.  This is me trying to mimick it from memory.  I hope I did it justice.

Summer Fruit Salad
Makes: 8 servings
Start to finish: 15 minutes

2 kiwi, sliced
10-12 medium strawberries, sliced (preferably organic)
1 cup seedless red grapes, halved (again, preferably organic)
1 granny smith apple, chopped (not to beat a dead horse or anything)
1 8oz can pineapple chunks, halved
1 16oz can mandarin oranges
1 banana, sliced---if serving immediately
lemon juice to coat

The assembly of this is pretty self explanatory so I won't bore you with pictures of me chopping fruit.  I do want to provide some suggestions/tips though.

The first one is about kiwi.  Is it me or is it fun to say the word kiwi?  This cute little fruit is sort of new to me.  I have tried it here and there but until this summer I had never purchased whole kiwis.  When I finally did get some and got them home, I stared at them a little perplexed.  How was I supposed to get this hard, brissly skin off without destroying the kiwi?  A quick youTube search revealed the answer.  You may be a kiwi master and already know this but I thought it was a pretty nifty trick.

You simply cut off a slice on each end of the kiwi, and then you wedge a spoon between the exposed skin and fruit until the skin just pops off.
 Once you've removed the skin you can slice this guy right up.

Now a little bit on why I chose the fruits I did.  First, I wanted a variety of color.  Green, red, orange, yellow... I wanted it all in there (we eat with our eyes first).  Also, I wanted a balance between tartness and sweetness (hence why I chose a granny smith apple over others for example).  So, as much as it may seem that I just threw this together, it was a very thoughtful process.

Some of these fruits are going to be prone to browning, specifically the apple and the banana so be sure that you coat these in lemon juice before adding them to the salad.  The banana will also have the tendency to get mushy the next day so since I knew I would be eating this for several days, I sliced off a few banana pieces as I ate each serving.


Here is the final product all tossed and ready to be devoured.  Isn't it pretty?  Trust me, it tastes as good as it looks.

Tell me, what are some of your favorite things to put in a fruit salad?